The Google Custom Search Plugin
If you intend to produce a lot of content for your site, or are expecting your visitors to have specific questions that they need to find the answers to, then including a search option can greatly increase the site experience. With the Google Custom Search plugin, visitors can utilize the power of Google's search engine but limit the search only to your site content.
Creating a custom search in Google
Before the plugin can be enabled and configured, you will need to create your custom search via Google. To do so, follow these steps:
- To begin, head over to the Google Programmable Search Engine homepage and after logging in, click on the blue "Add" button.
- On the next screen, enter name your search engine into the Name your search engine field, and below, the website's URL into the What to search? field and click on the blue "Add" button; this will ensure your entire site is searched. You may also restrict the search to particular areas of your site if you wish, but generally you'll want to have the whole site available for searches.
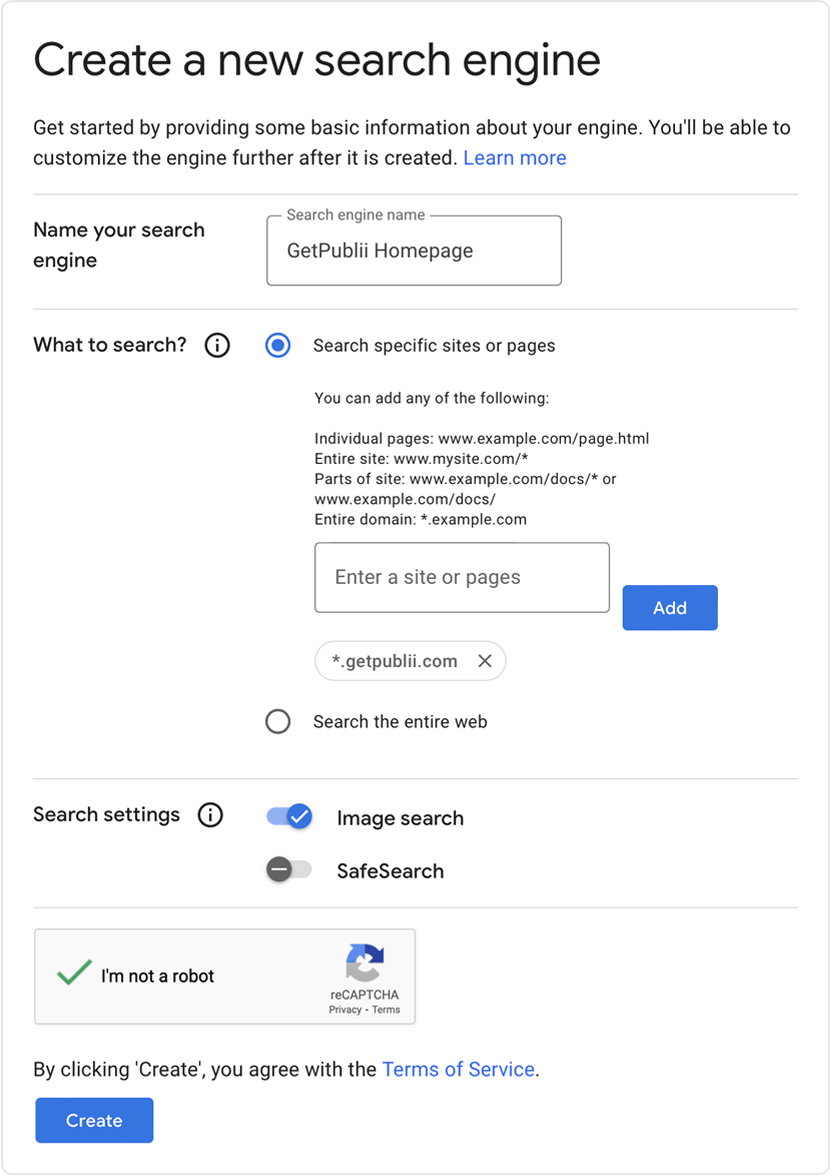
- On the same screen you can enable the Image search or SafeSearch option, then click the Create button to create the search.
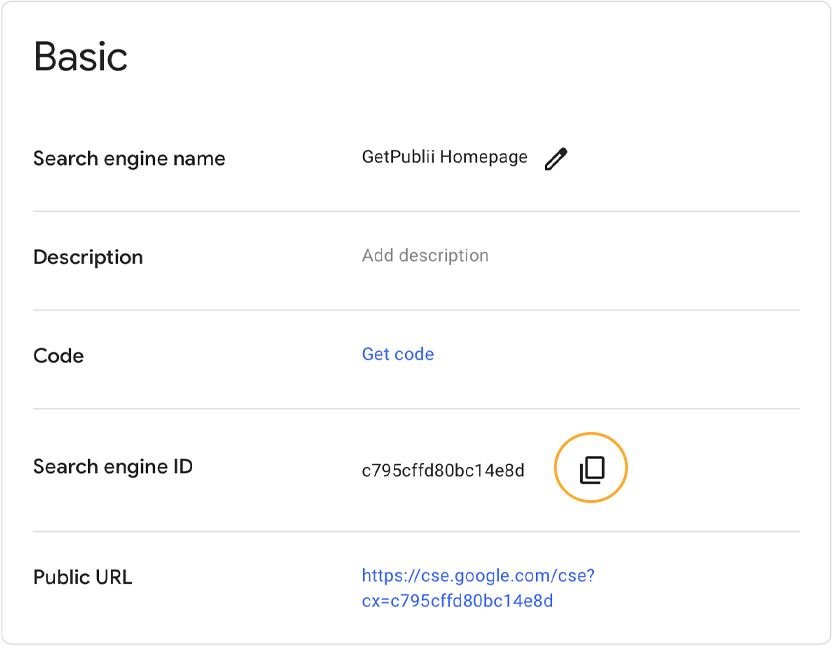
- The search is now created, but we have to make a few changes and grab some important information for later when we set-up the plugin in Publii. Click on the Customize button to be taken to the Overview page.
- We don't need to use the code generated by search, because the plugin will insert the appropriate code on the live site, but we do need a Search engine ID so that the plugin is able to find your custom search. Click on the Copy icon in the Search engine ID section and save this ID for later.
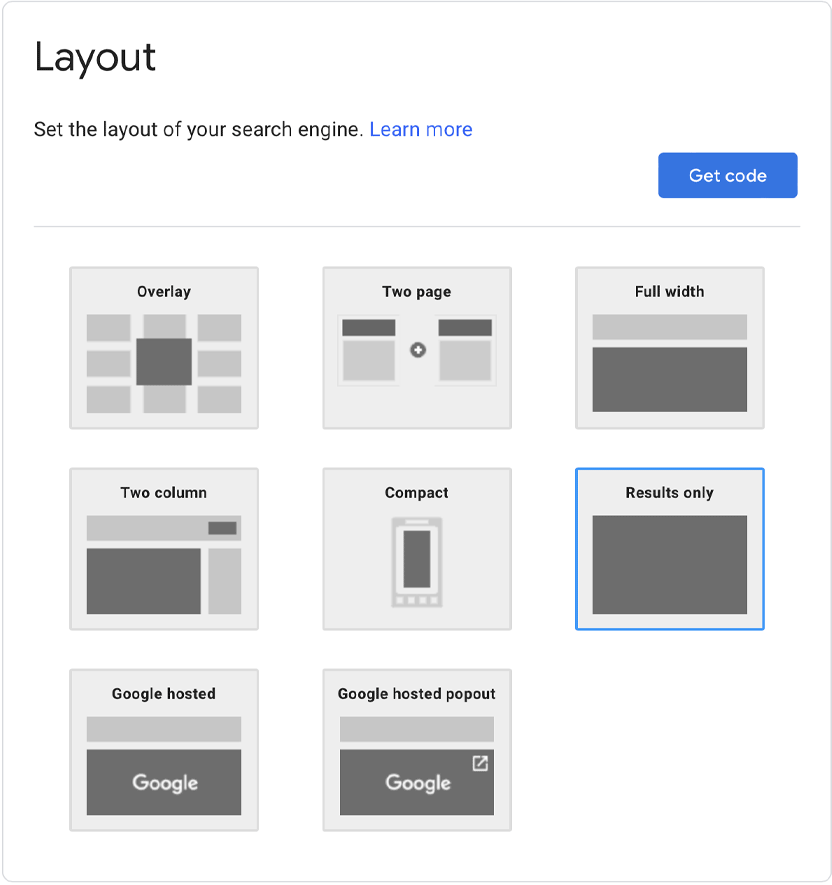
- Now, click on the Look and feel option in the left sidebar or scroll down the page. Here you can set how the searches look on your site; click on the All Look and Feel settings button, you will be taken to the Look and Feel page. Now, in the Layout section, select the Results only. This ensures that the search on your site utilizes the Publii layout.
The Google side of configuration is now ready to go, so now we can get started with configuring the Google Custom Search plugin in Publii.
Additionally, you can change the default 'q' query parameter name for Programmable Search Engine. You can do so navigating to Advanced Settings page: in the left sidebar click on the Search Features, then on the Advanced Settings. Now click on the Go to Advanced Settings button. On the next page click on the Websearch Settings tab and here you will find the Query Parameter Name field, where you can change the default query parameter.
Note this query parameter down as we'll need to match the option in the Publii plugin.
Enabling the search area in your theme
In order for the plugin to display the search bar on your site, it requires a specific section to be set aside for it in the theme. All official Publii themes, both free and premium, include a specific section for the search bar, but it is disabled by default. To enable the search area, follow these steps:
Note: If you are using a custom theme, then it may not include a specific section for the search bar. In such cases, it will be necessary to manually add the section to your theme; more information on how to do this is contained in the next section of this guide.
- In the Publii app, click on the Theme option in the left-sidebar menu to open the Theme Settings page.
- In the second section of this page, titled Custom Settings, click on the Search option to see the search settings for your site.
- Enable both of the options in this section; Search, which enables the search box in the main menu or other area specified by the theme, and Search subpage, which creates a search page where the results of any searches can be displayed.
- Once enabled, click on the Save Settings option at the bottom of the page to save the changes.
The search area is now enabled, and we can move on to the plugin.
Adding search functionality to a custom theme
If you are using a custom theme that doesn't have search functionality added, when opening the plugin configuration you will see a message advising that Your current theme doesn't support a required feature: custom search. In order to make use of the Google Custom Search plugin you will need to make some changes to your theme files' code to add the search bar and page to your theme. This is only required if you are using a custom or modified theme; all official Publii themes, both free and premium, already include this code.
To add search functionality to your theme, insert the following code snippet in the appropriate theme file where you want the search box to appear. This will render a search input field and button that visitors can use to search your site.
{{{@customSearchContent}}}Important:
This shortcode must be placed in a theme file, not within post or page content.
You’ll find your theme files at the following location:
Documents ▸ Publii ▸ sites ▸ YOUR_SITE ▸ input ▸ themes ▸ YOUR_THEMETo display the search results, we need to update ot create (only if your theme does not contain it) a search.hbs file and paste here the following code snippet:
{{{@customSearchContent}}}We also need to modify the config.json file (only if your theme does not support the search plugins) by updating the 'renderer' and 'supportedFeatures' sections with the following flags:
"renderer": {
     "createSearchPage": true
 },
 "supportedFeatures": {
     "searchPage": true,
     "customSearch": true
 },
The search is now configured, and you can move on to enabling and configuring the plugin. Note that if the previous steps have not been followed correctly, you will see an error message at the top of the plugin configuration screen advising you that the theme does not currently support the search function.
Enabling the plugin
To activate the plugin, open the Tools & Plugins section of the Publii app via the left-menu to see a list of installed plugins. Click on the switcher button in the bottom-left of the Google Custom Search box in this list to enable the plugin.
We'll need to configure the Search Engine ID for your custom search at a minimum, so click on the Google Custom Search box again anywhere except on the switcher button to open the Plugin settings page.
Google Custom Search plugin options
There are two important options in this plugin that are required; Search Engine ID and Search Parameter (which by default is set to 'q', which tells Google's search engine to search for whatever the user has entered in the search bar). The other options may be changed or enabled depending on personal preference:
Search configuration
- Search Engine ID - Enter your Google Search Engine ID in this field; this is required for the plugin to function.
- Search Parameter - This defines how the search should be done; by default this is set to 'q', which tells the search engine to search for the content in the search bar. This should be left as default except by advanced users who are familiar with the various parameters that may be used in this field.
Theme integration
- Input Placeholder - Text entered in this box will be used as the placeholder text in the search bar before the user clicks on the field to enter their own text.
- Autofocus - If enabled, the browser will be directed to focus on the search field when the page loads, allowing users to immediately begin a search.
- Submit Button - If enabled, a submit button will be displayed in the search box for users to click to start the search; the second option in this section allows for the submit button to also be displayed on the search results page also. Please note that custom themes may require additional CSS styling in order to ensure the button displays properly.
- Submit Button Label - Sets the text that should be displayed on the submit button; by default this is set to 'Submit'.
Cookie Banner integration
- Cookie Banner Integration - Enabling this option will add an option to the built-in Publii cookie banner for users to consent to cookies from Google when using the search option.
- Cookie Group ID - This option only becomes available when the Cookie Banner Integration option is enabled. Here, you can specify the cookie group that the Google cookies should be added to. Make sure to add this group name to the GDPR section of the site settings. You can find instructions on how to do this in the GDPR section of this documentation.
- Fallback message - Sets a message that should be displayed if the user does not consent to using Google Custom Search scripts. By default, this will advise users that they need to change their cookie preferences in the banner before comments can be displayed.