Creating and Editing Pages
Starting from version 0.46, Publii CMS includes a feature for creating pages, which serve as static subpages on your website. The process for creating and editing pages is almost identical to that of posts, so you'll feel right at home! You can choose any editor you like, whether the Block Editor, Markdown Editor, or WYSIWYG Editor, to add your content to the page.
Pages are useful for content such as an About page, contact information, or details of your services. They are managed separately from posts and do not appear in the regular post listings on your website.
Creating Pages
- Open Pages in the left sidebar. If you haven't created any pages yet, choose an editor from the Choose editor screen.
- If you already have pages, click Add new page to use the selected editor, or click the arrow beside the button to choose a different editor.
- Add a title and your page content. You can use the same editing tools as you would when writing a post.
- Use the save menu at the top-right of the editor to choose Save or Save and close. If the page isn't ready to publish, choose Save as draft.
Draft pages are not included in the published website. To publish a saved draft, select its checkbox in the Pages list and choose More > Publish before synchronizing your site.
Editing Pages
To edit an existing page, click its title in the Pages list. When editing a page, in addition to the familiar options available for post editing, you have the Parent page dropdown menu in the Status section of the right sidebar. By selecting another page as the parent for the current page, you can create a hierarchical structure for your site. For example, you could place a Team page under an About page.
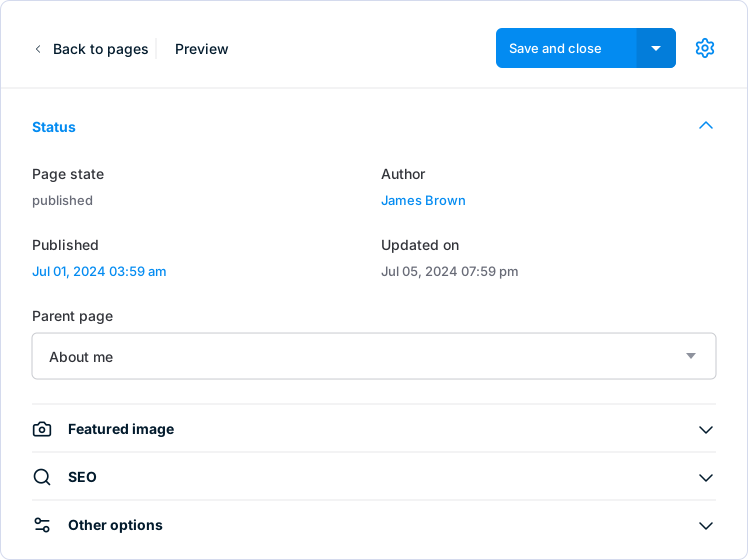
Select No parent if you want the page to remain at the top level. A page cannot be its own parent, and its existing subpages are excluded from the dropdown to prevent a circular hierarchy. Save the page to apply your selection.
If the right sidebar is hidden, click the settings icon next to the save button to open it. The sidebar also includes settings for the featured image and SEO, including the Page slug. Under Other options, you can select a Page template if your theme provides additional templates.
Managing Page Hierarchy
The Edit hierarchy option in the Pages listing is located on the right side of the screen, opposite the filter options. After clicking it, a Move link will appear under each item on the list. Click Move under the page you want to reposition, then use one of the following options under the destination page:
- before - Place the selected page before the destination page, at the same level.
- after - Place the selected page after the destination page, at the same level.
- as subpage - Make the selected page a subpage (child) of the destination page.
Moving a page also moves its existing subpages. Each move is saved automatically. Click Unselect to cancel the current selection without moving it, or Close edit to leave hierarchy editing.
Page Hierarchy and URLs
To use nested page URLs, enable Use pretty URLs under Site settings > Advanced options > URLs. Publii will prompt you to enable this setting if you open Edit hierarchy while it is disabled.
With pretty URLs enabled, a Team page with the slug team placed under an About page with the slug about can have the address /about/team/. Without pretty URLs, the hierarchy is not reflected in the address, which uses the page's own slug, such as /team.html.
Changing a published page's parent can therefore change its URL, along with the URLs of its subpages. If visitors already use the old addresses, update any manually entered links and set up redirects where needed.
Adding Pages to Your Menu
Page hierarchy and menu structure are managed separately. Creating a page or making it a subpage does not automatically add it to your website's navigation. To include a page in a menu, open Menus, add a menu item, choose Page link as its Type, and select the page. Arrange the menu items and submenus there to control how visitors navigate your site.
Using a Page as Your Homepage
You can also use a page as your website's homepage. With a theme that supports pages, open Site settings > Advanced options > SEO, find the Homepage section, enable Set page as homepage, and choose the page from Select page. Save your settings to apply the change.
If you also want to keep a separate post listing, enable pretty URLs and enter a Post prefix, such as blog, in the URLs tab. This gives the post listing its own address, such as /blog/, and allows post pagination when a page is used as the homepage. The prefix also applies to individual post URLs.
Summary
Creating and editing pages in Publii CMS is very similar to working with posts, with the addition of page hierarchy. Once you've saved your pages and arranged their hierarchy and menu links, use Preview site to check the result. When you're ready to make the changes live, click Sync your website. Saving a page in the app does not update the live website until you synchronize it.