Website Management: Creating, Deletion, Switching and Duplication
The first time you run Publii, the website creation screen opens with the Create your first website tab selected:
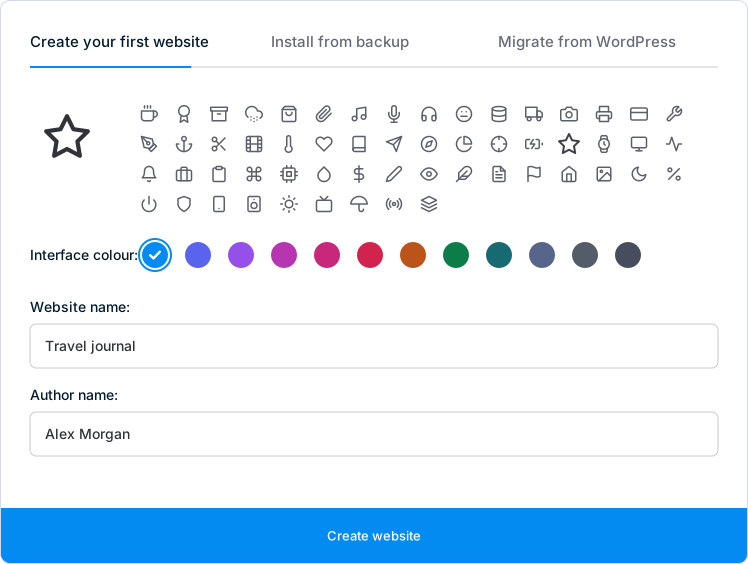
There are only a few steps to take care of here, but it's useful to understand what each setting controls:
- First, choose an icon for your site. This icon will be displayed only in the Publii interface to help you distinguish this site from any others you create later; it will not affect the live website. Click on the icon you wish to use; a preview will appear on the left.
- Choose an Interface colour. This changes the accent colour of the Publii interface while you work on this website. It does not change the colours of your published site.
- Enter the website name in the Website name field. This name identifies the website in Publii and is also used by default in the live site's text logo and browser tab titles, depending on your theme and SEO settings.
- Enter your name or the name of the person who will be writing for your site in the Author name field. This creates your first author, whose name can appear on posts and an author page, depending on your theme and settings. Additional authors may be added via the Authors section of the Publii interface.
With these steps finished, click on the Create website button. At this point you can start adding posts, pages and tags. Before publishing, choose a theme for your site and configure your server settings; you can find details on these steps in the Installing Theme and Server Configuration sections.
Publii doesn't place a limit on the number of websites you can create and manage. To make creating, managing and switching between your websites easier, Publii includes a website management screen, which can be accessed by clicking on your website name at the top of the left sidebar.
Creating a site from a backup
If you have already used Publii and have a backup file that you would like to restore, click on the Install from backup tab at the top of the website creation screen:
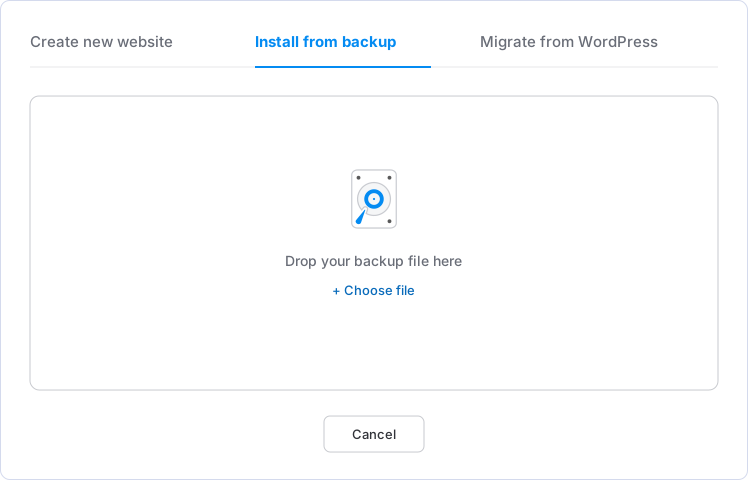
A box will appear where you can drag and drop your Publii .tar backup file, or click on the Choose file button to select it. Once Publii has checked the file, a dialogue box will open where you can enter the site name. This defaults to the original site name, but you can change it if you wish. Next, click on the Create website button to restore your site. Once the process is finished, the restored website will automatically open, ready to modify.
If a website folder already exists under the chosen name, Publii will ask whether you want to replace it. Click Choose another name to restore the backup as a separate website, or Replace website to overwrite the existing local folder with the backup contents. Replacing the folder cannot be undone.
Creating a site from WordPress
To start a new Publii website using content exported from WordPress, open the Migrate from WordPress tab. Drag and drop your WordPress WXR .xml export file into the upload area, or click Choose file to select it.
After checking the file, Publii displays a form where you can choose a site icon and interface colour, and review the suggested website and author names. Click Create website and continue to create the site and open the WordPress importer with your file already selected. You can then review the import options and start the import.
Creating additional websites
If you want to create another website, click on the current website name at the top of the left sidebar. This opens the website switcher shown below, where your available websites are listed. Click on Add new website at the top-right of this screen to create another site.
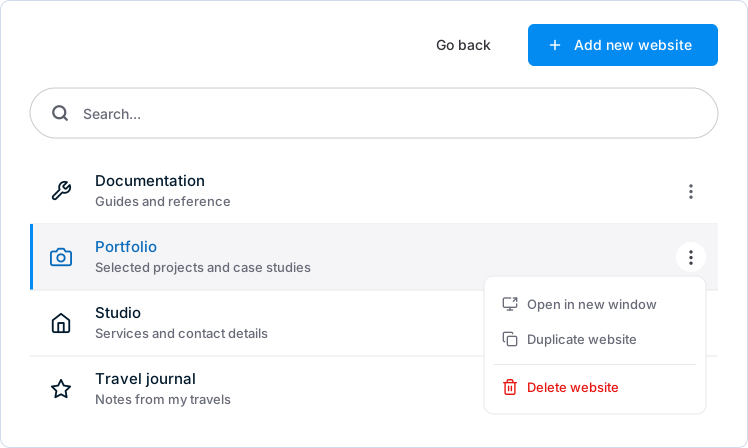
This opens the website management screen, where your available websites are listed. To create a new website, click on the Add new website button at the top of the screen.
This will take you to the Create new website tab, where you can set the basic options for your site. Once done, click on the Create website button to complete creation. You can also use the Install from backup or Migrate from WordPress tabs here.
Each website that you create in Publii is a separate site. General options in App settings apply across the app, while each website has its own content, theme settings and server configuration.
Switching websites
Once you've added more sites to Publii, you can switch between them by opening the website management screen. Your available websites will be listed in the main window. From here, click on the website you wish to work on to switch to it.
If you have a large number of sites, type the website name you're looking for into the Search field at the top of the list. Publii filters the list as you type.
To work on another website in a separate window, open its Other options menu using the three-dot button beside the site name, then choose Open in new window. You can also hold Command on macOS or Ctrl on Windows and Linux while clicking the website. This option is unavailable for the site already open in your current window.
Duplicating a website
If you wish to create a duplicate of an existing site, open the website management screen. Click the three-dot Other options button beside the website you wish to duplicate, then choose Duplicate website.
A dialogue box will open where you can enter a name for your duplicate site. Choose a different name from your existing websites, then click on the Clone website button to create it. Publii automatically switches to the duplicate when it is ready.
The duplicate includes the original site's content and theme configuration, but its deployment connection settings are reset. Configure its Server settings before publishing it.
Deleting a website
To delete a website, open the website management screen. Click the three-dot Other options button beside the website that you wish to delete, then choose Delete website.
To prevent accidental deletion, Publii asks you to confirm the action. Click on the Remove website button to continue.
Publii moves the website's local folder to your system's trash and deletes its saved server credentials. The published website remains online. If the website is open in another Publii window, close it there before removing it.